
Introduction
Have you ever wondered if you are solving problems the right way in your NestJS app? Or if you could have used a more suitable component for your use case? I have been in this situation many times.
Understanding the execution order of code in NestJS is quite challenging. Its reliance on a class-based structure, coupled with the extensive use of decorators, often makes it difficult to track the flow of code execution.
With this article, I'm taking a shot at trying to demystify the components involved in a request lifecycle and the order in which they run. I'm hoping that after this deep dive, you will have gained actionable insights on how to debug your code and choose the right component to use for your use case.
A good understanding of decorators, Modules and Controllers is recommended to fully understand this deep dive. For a refresher, check out this introductory video by NetNinja.
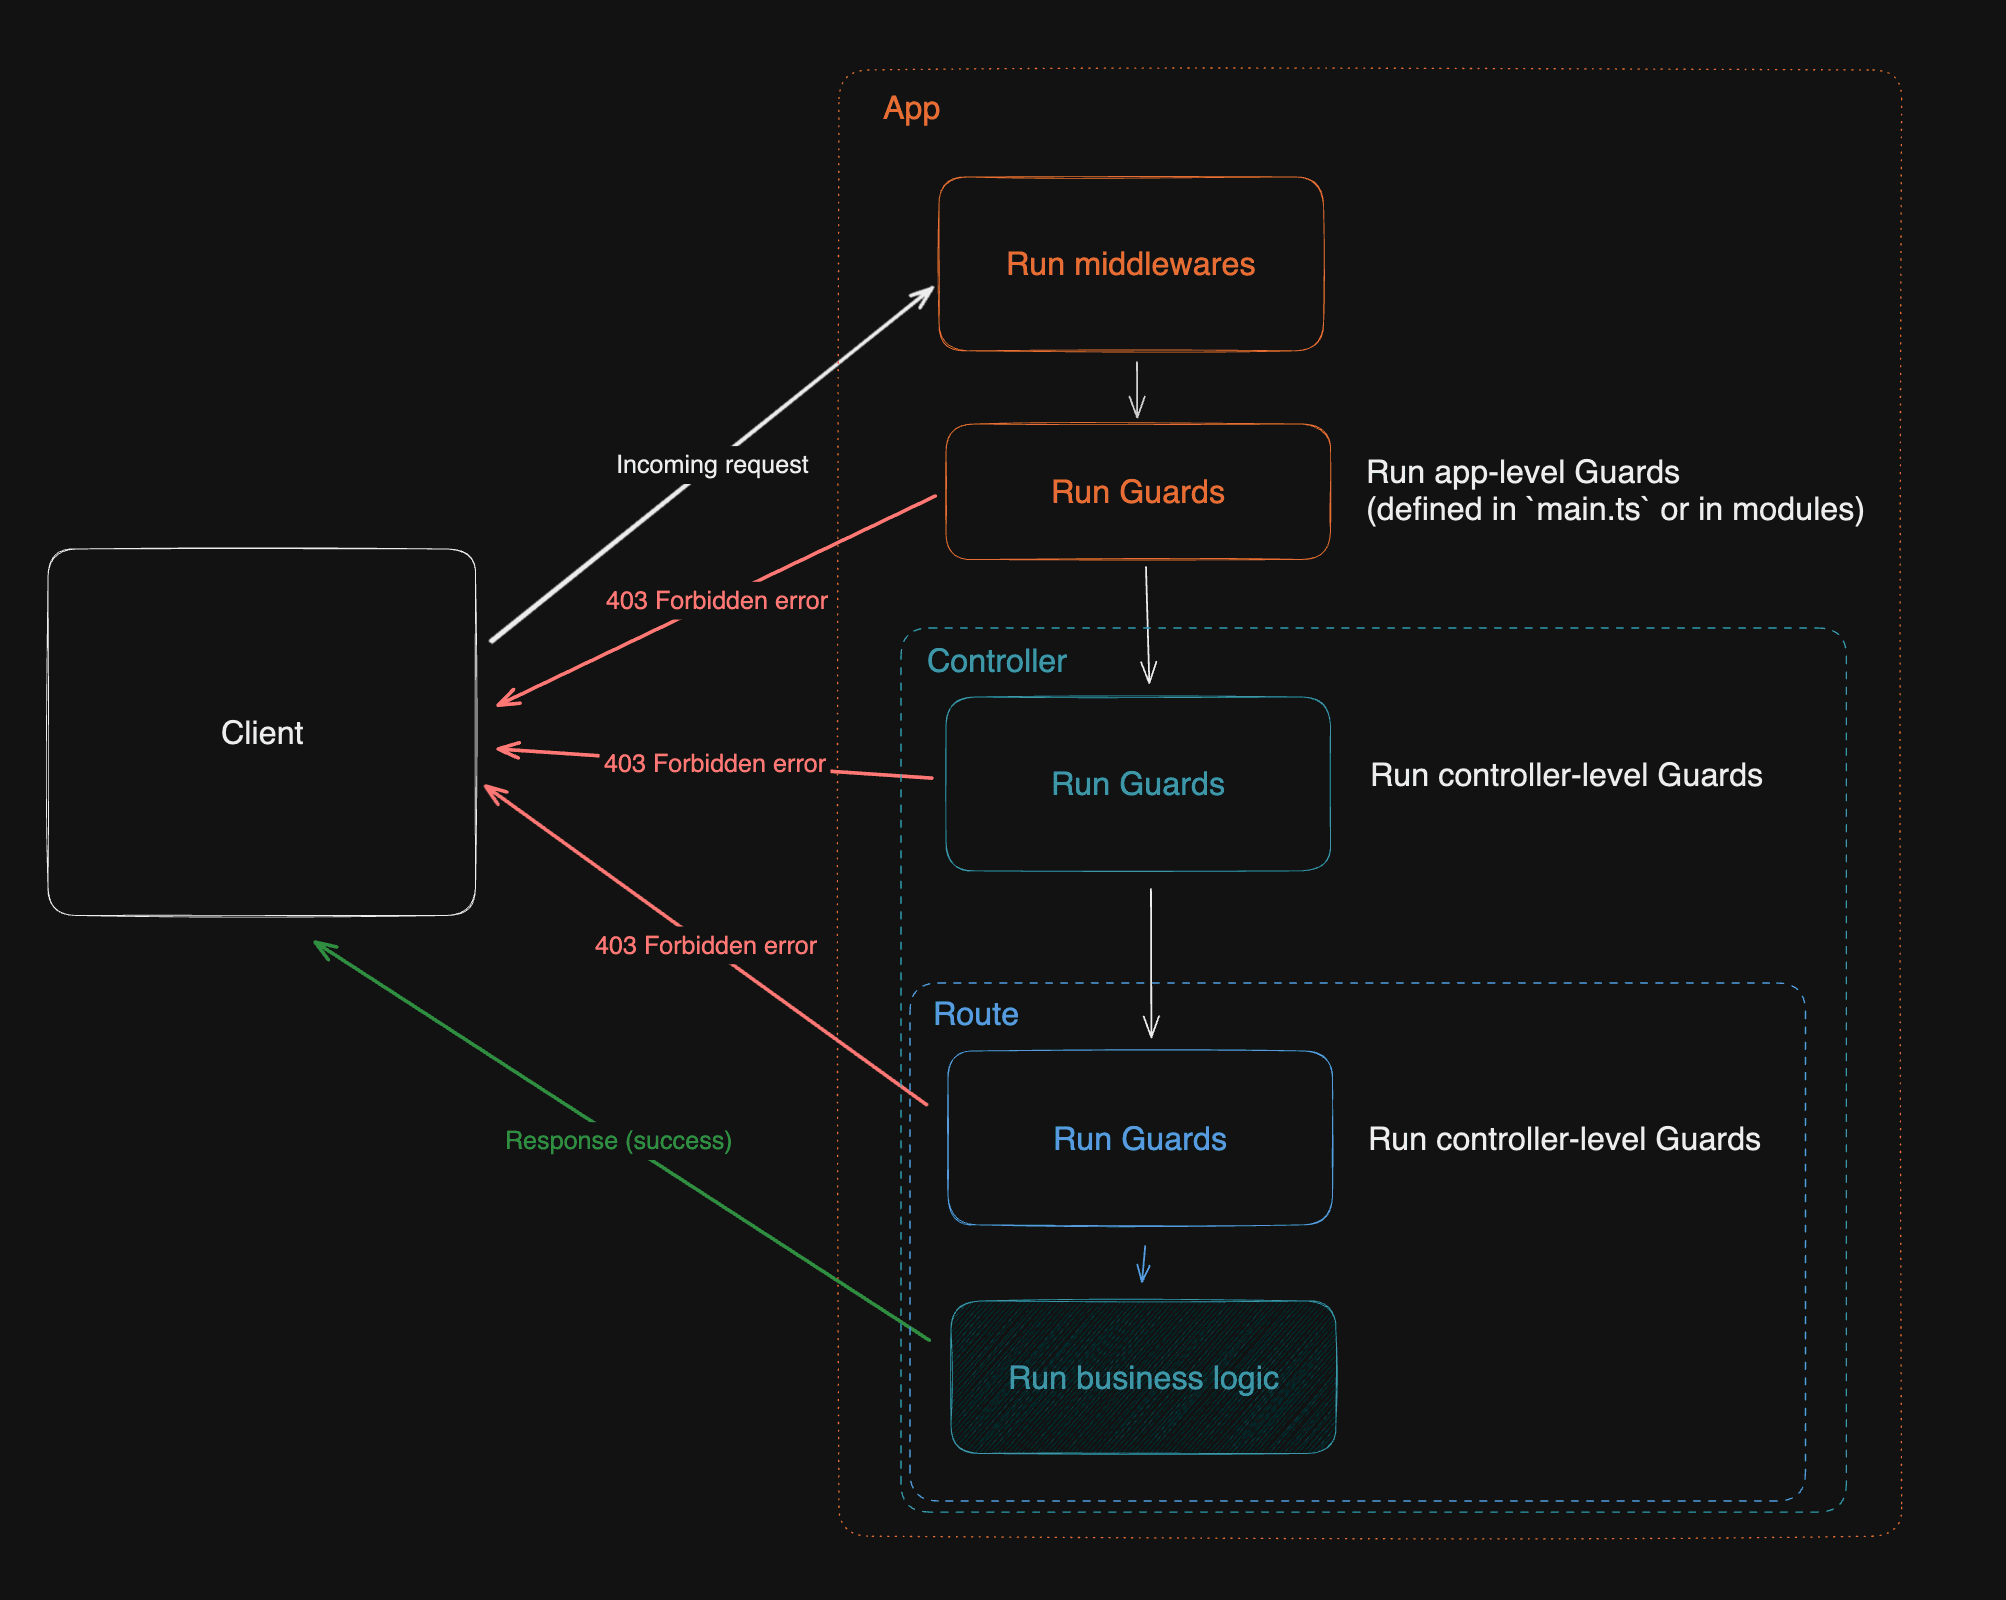
Spoiler alert: The request lifecycle
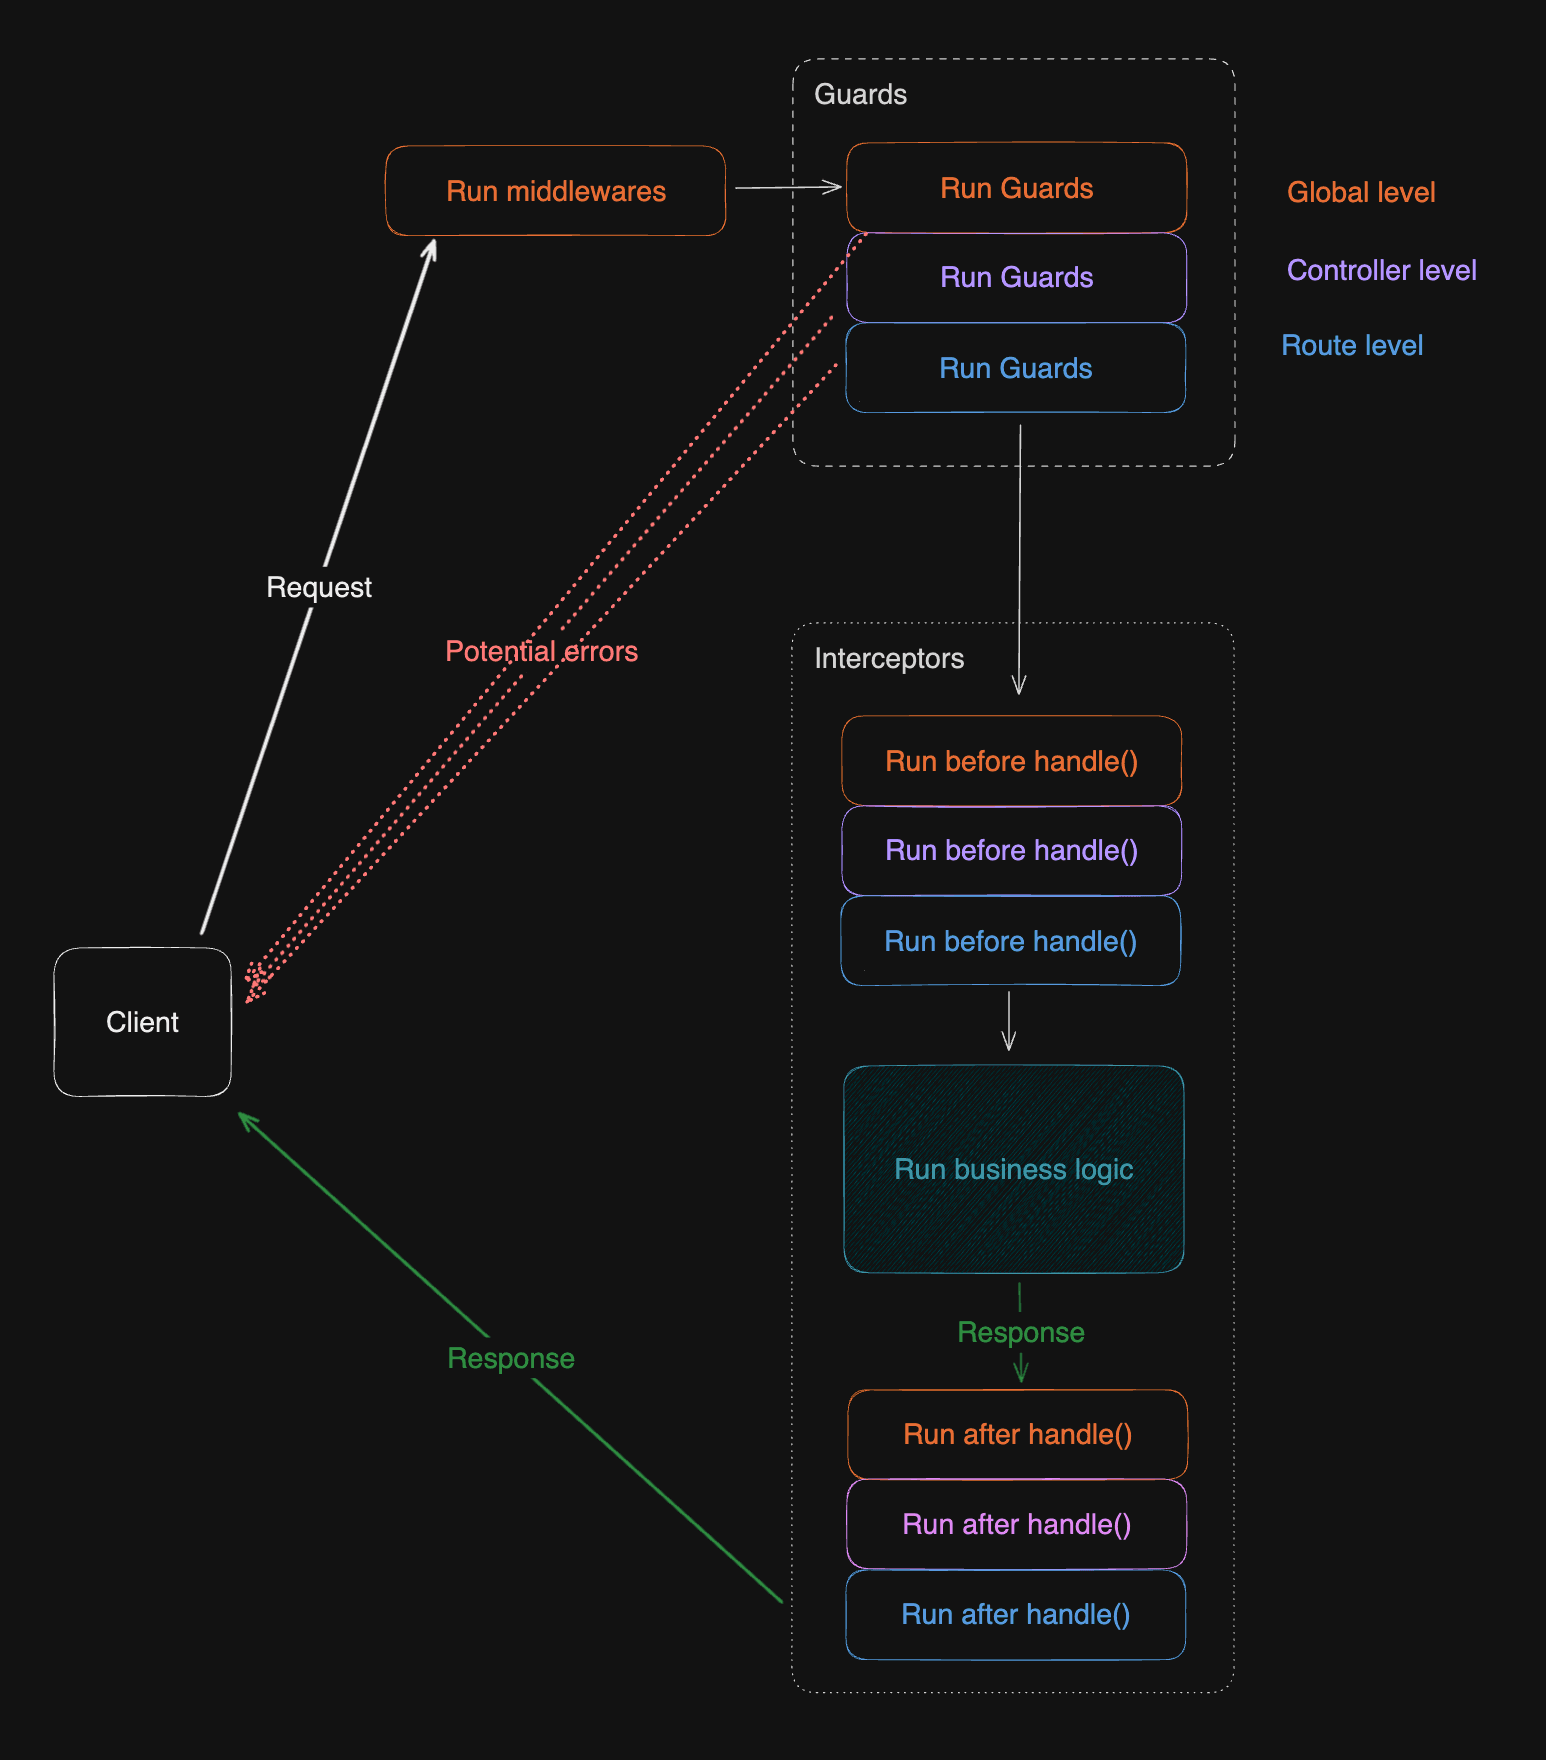
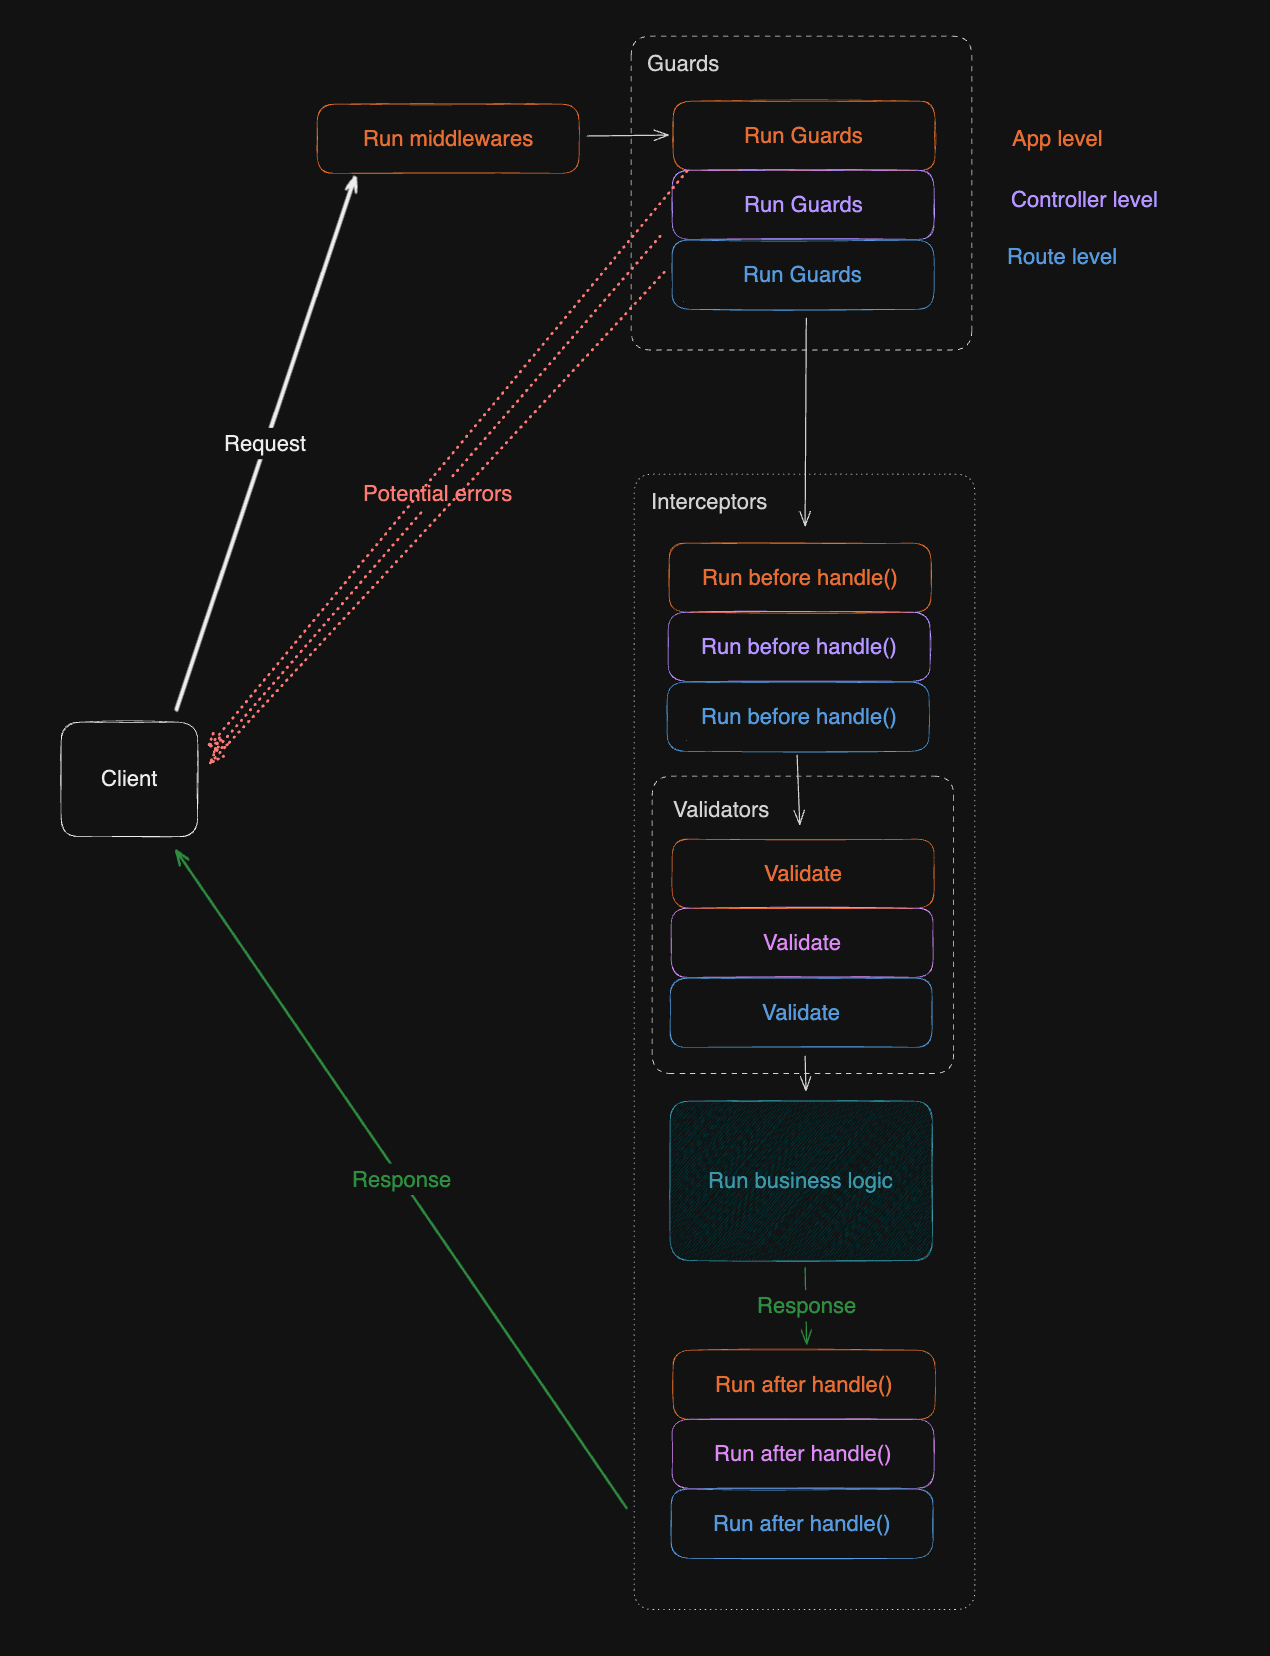
If you don't wish to read the whole article, here the final diagram of a request lifecycle:
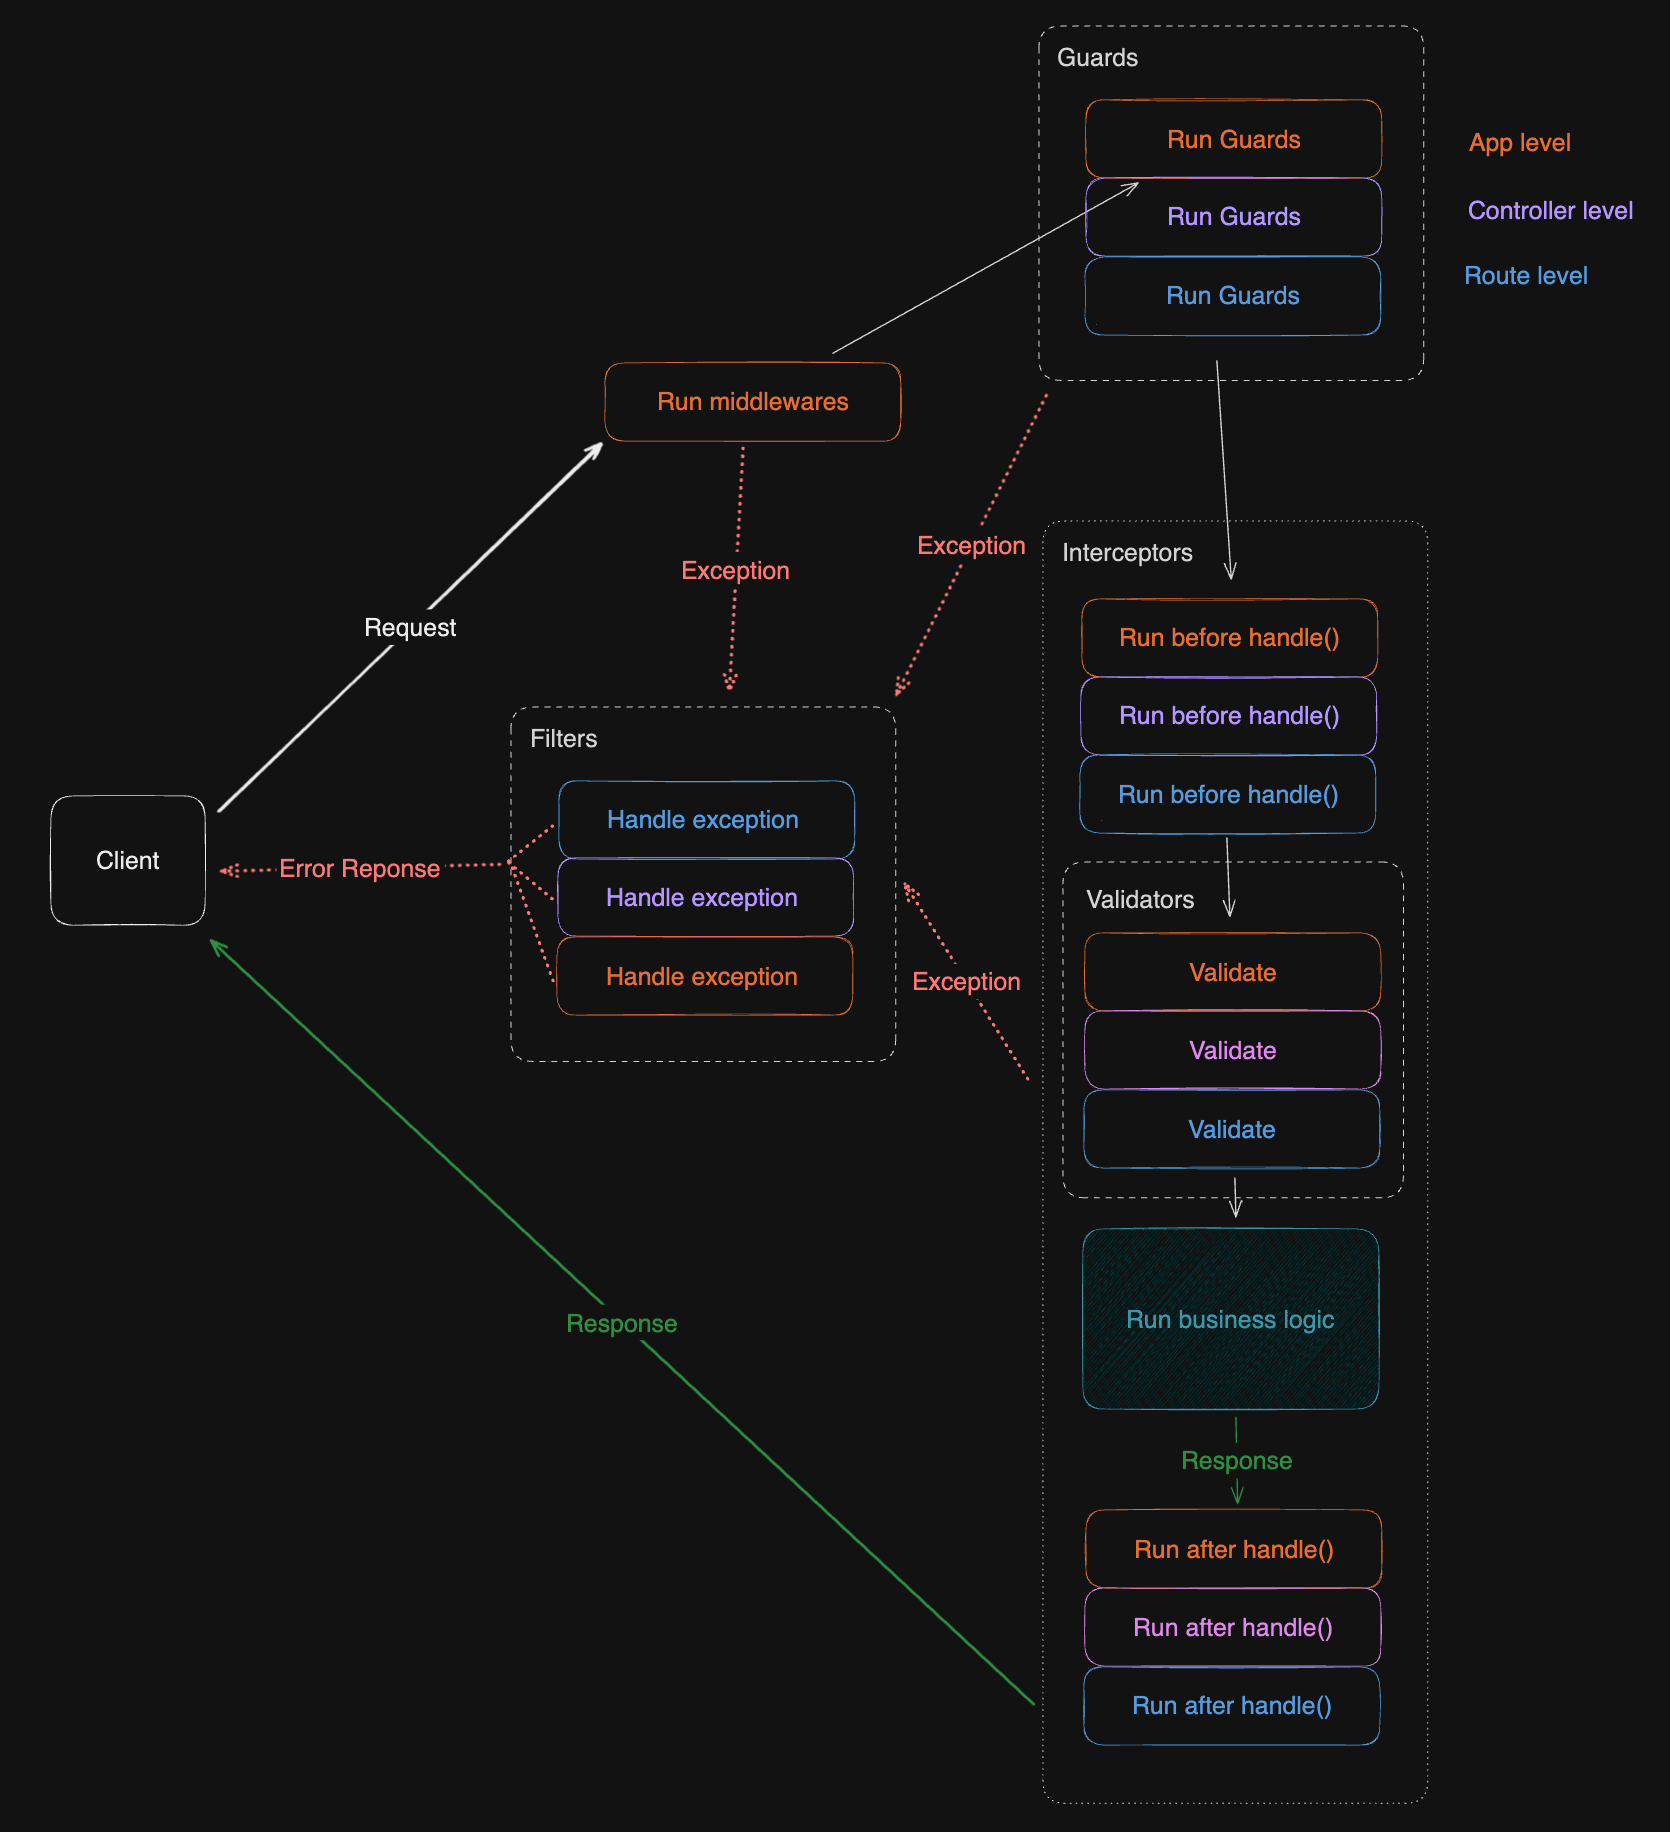
If you wish to understand better how we got there, keep reading! 😄
Getting started
Let's start with a basic NestJS app:
// app.module.ts
@Module({
  imports: [],
  controllers: [AppController],
  providers: [AppService],
})
export class AppModule {}

// app.controller.ts
@Controller()
export class AppController {
  constructor(private readonly appService: AppService) {}

  @Get('/og')
  async getFirstUserName(): Promise<string> {
    return await this.appService.getFirstUserName()
  }
}

// app.service.ts
@Injectable()
export class AppService {
  async getFirstUserName() {
    return 'John Doe'
  }
}
This is pretty straightforward. We have an /og route that returns the John Doe when called.
Middlewares
Middlewares are also common in Express.js. They intercept requests and have access to request and context. You can trigger the next middleware using next().
You can find the source code for the whole article here.
Now let's say we want to add, for all our routes, some logic that logs what route is being hit and which user-agent is used to send the request (to ultimately send this to our analytics). It'll look like this:
import { Injectable, NestMiddleware, Logger } from '@nestjs/common'
// Assuming you're using express, don't forget to add @types/express to your project
import type { Request, Response, NextFunction } from 'express'

@Injectable()
export class LoggerMiddleware implements NestMiddleware {
  private readonly logger = new Logger(LoggerMiddleware.name)

  use(req: Request, res: Response, next: NextFunction) {
    // We only log the user agent to keep it simple.
    this.logger.debug(
      `Middleware -- Received request from agent ${req.headers['user-agent']}`,
    )

    next()
  }
}
Now let's add the Middleware to our AppModule:
@Module({
  imports: [],
  controllers: [AppController],
  providers: [AppService],
})
export class AppModule {
  configure(consumer: MiddlewareConsumer) {
    // For all routes
    consumer.apply(LoggerMiddleware).forRoutes('*')
    // OR to target a single controller:
    consumer.apply(LoggerMiddleware).forRoutes(AppController)
  }
}You can also get your Middlewares to exclude routes and target specific routes.
Now, what's cool is that at every request our server processes, we're going to see the following:
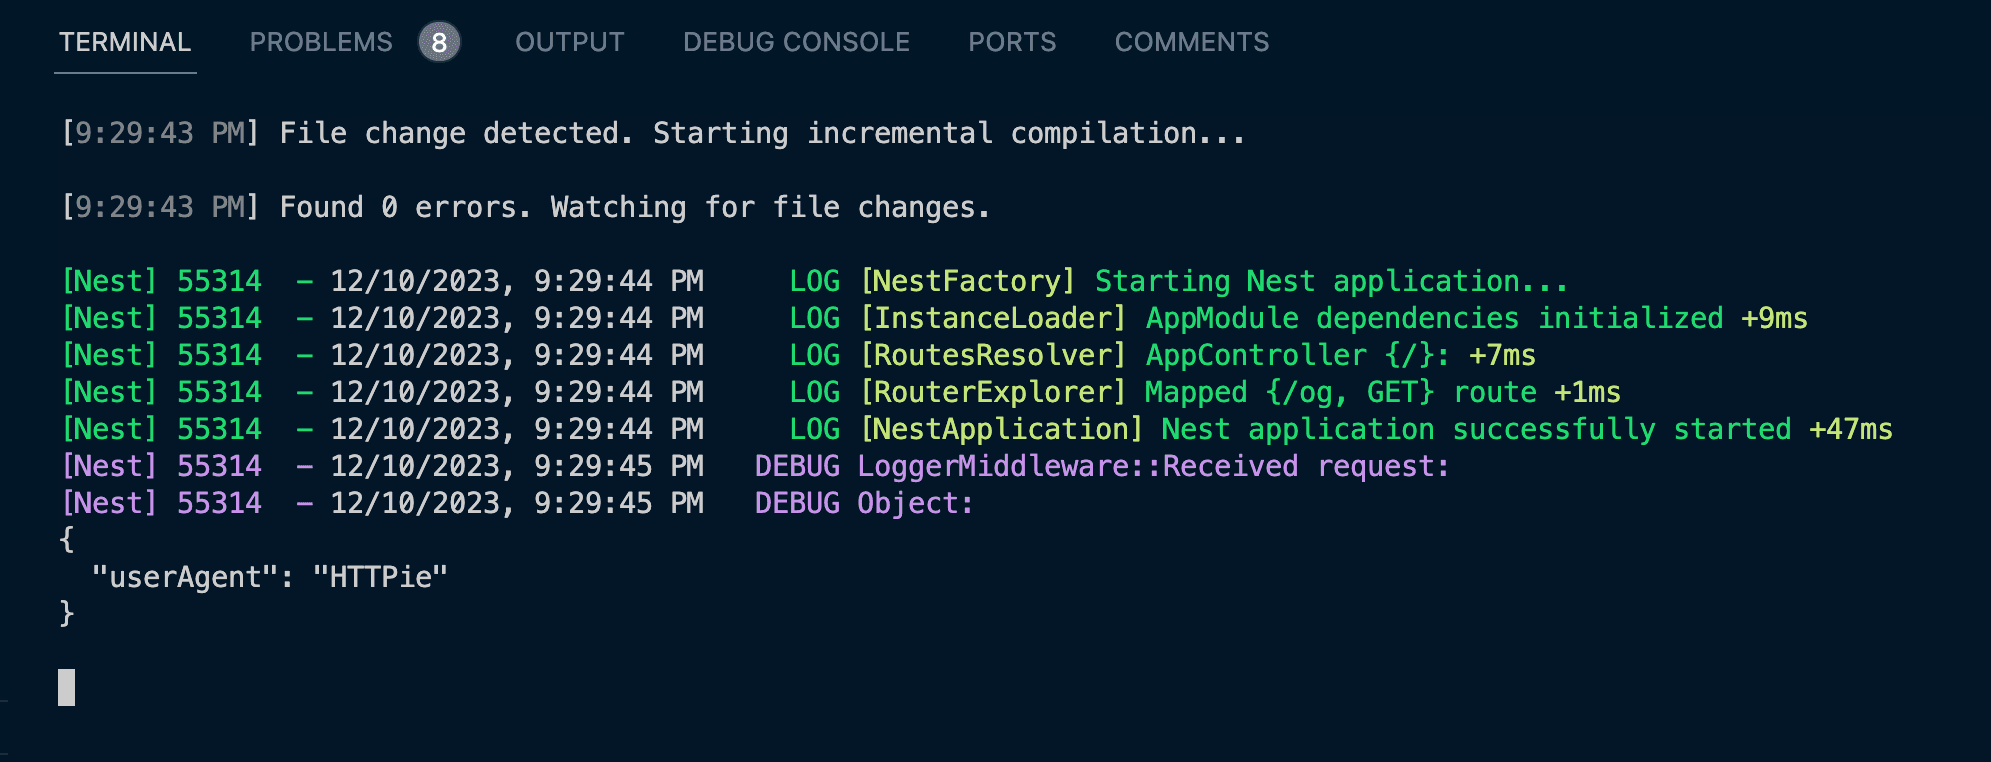
Middlewares are pretty effective if you want to simply modify the request object, but they don't integrate really well with the rest of NestJS's ecosystem (i.e. Controllers and Services). Thankfully we've got a few more tools at our disposal...
Guards
Guards are also Middlewares, but they have some extra capabilities.
- They can be added at the app, Module, Controller, or route levels.
- They implement a
canActivatemethod that is ran at each request it handles and throws aForbiddenErrorif it returnsfalse. Otherwise, it goes to the next Middleware (equivalent to callnext()). - They generaly are used to handle authentication and authorization for specific Modules or routes.
Let's take the Guard example from the NestJS documentation and implement it in our app:
@Injectable()
export class AuthGuard implements CanActivate {
  guardLevel: string

  constructor(private level: string) {
    this.guardLevel = level
  }

  canActivate(context: ExecutionContext) {
    const request = context.switchToHttp().getRequest<Request>()

    Logger.debug(`Guard ${this.guardLevel} -- Verifying cookie`)
    const cookie = request.headers.cookie

    return !!cookie
  }
}
For simplicity's sake, we will only check if a cookie header is present and throw otherwise.
We also added a way to log the context in which the Guard is being executed, this is useful because we actually can add the Guard at different levels in our app:
// main.ts
async function bootstrap() {
  const app = await NestFactory.create(AppModule)
  // Here, we add the Guard at the global level after creating the app
  app.useGlobalGuards(new AuthGuard('main'))
  await app.listen(3000)
}

// app.module.ts
@Module({
  imports: [],
  controllers: [AppController],
  providers: [AppService],
  // Here, we add the Guard aft the module level
  {
    provide: APP_GUARD,
    useFactory: () => {
      return new AuthGuard('app module');
    },
  }
})
export class AppModule {
  // ...
}

// app.controller.ts
@Controller()
// Here we add the Guard to a specific controller
@UseGuards(new AuthGuard('controller'))
export class AppController {
  constructor(private readonly appService: AppService) {}

  // And here we add the Guard to a specific route
  @UseGuards(new AuthGuard('route'))
  @Get('/og')
  async getOG(): Promise<string> {
    // ...
  }
}The code in this article is for demo purpose only. It doesn't make sense to use the same Guard at different levels. If a whole Module is protected by a Guard, you don't need it at the Controller or route level. But you may have other Guards at these levels in a production app, hence the importance to know in which order they are called.
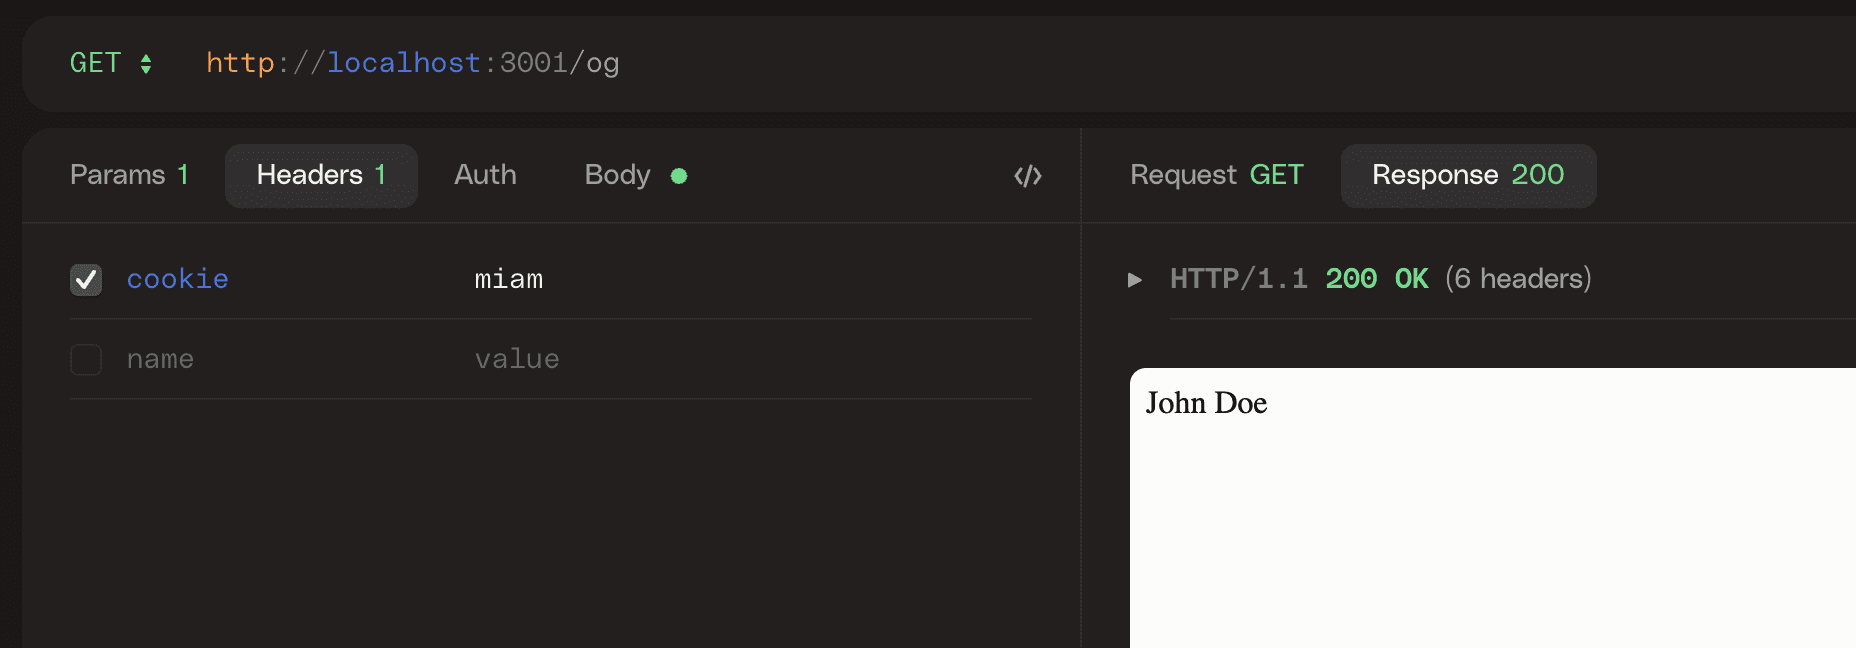
Now, let's send a first request without the header and see what happens:
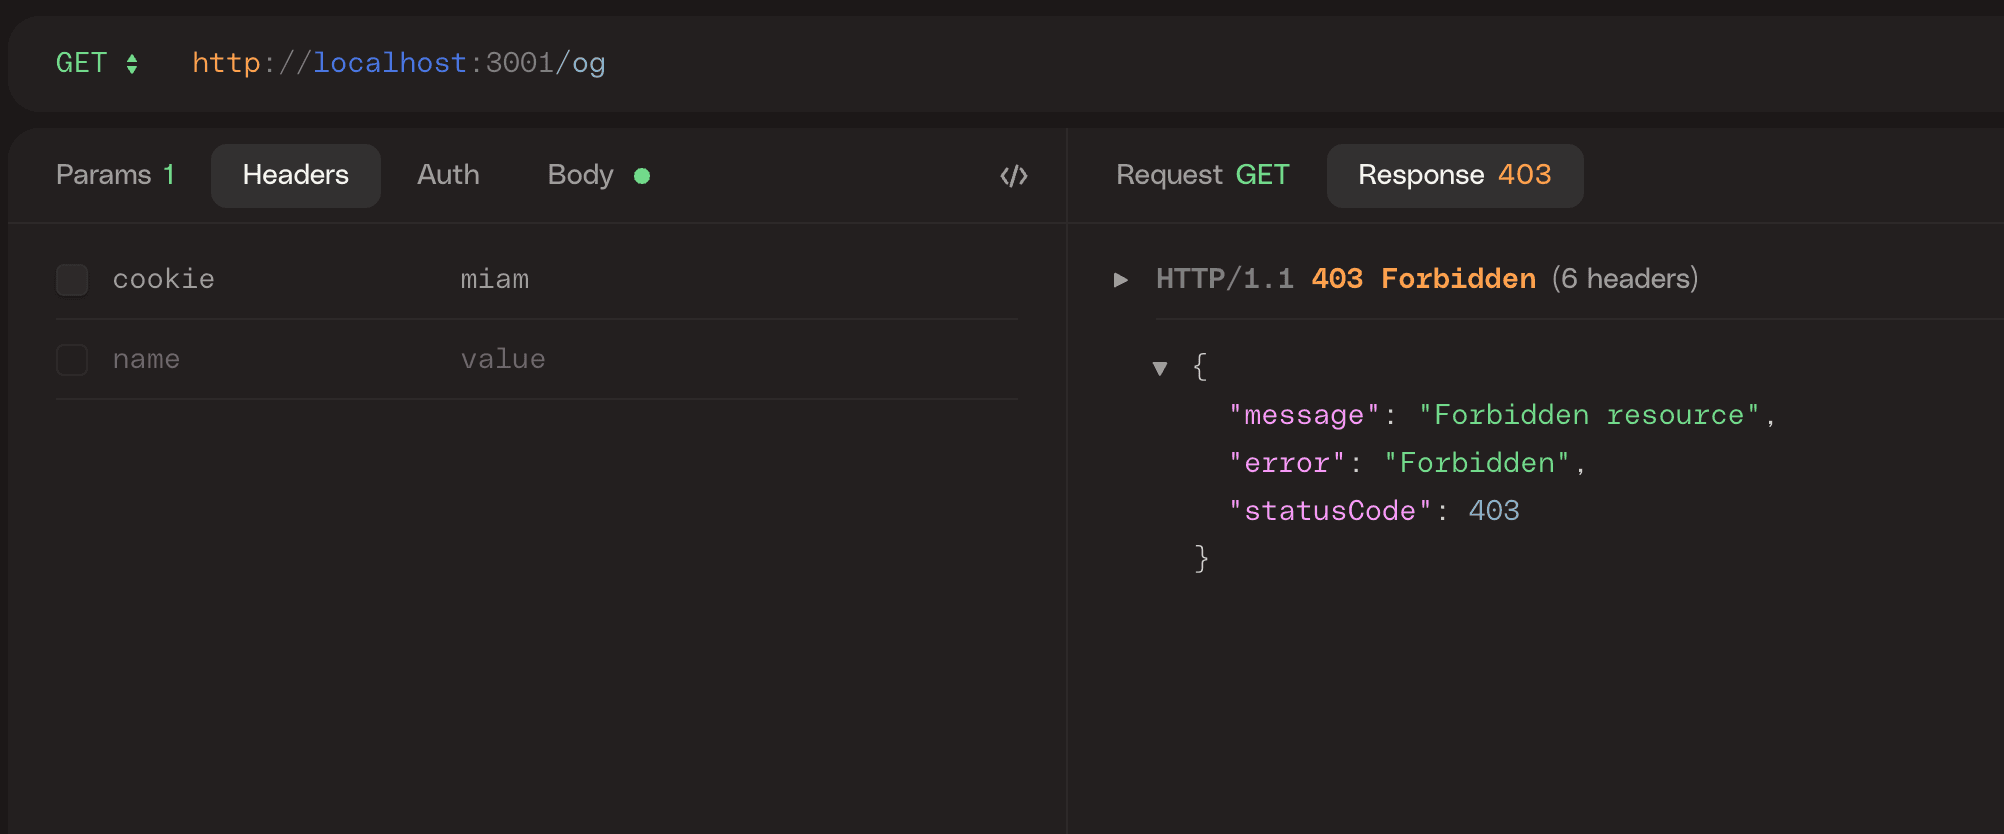
Nice. We got a ForbiddenError as expected. Now the logs:
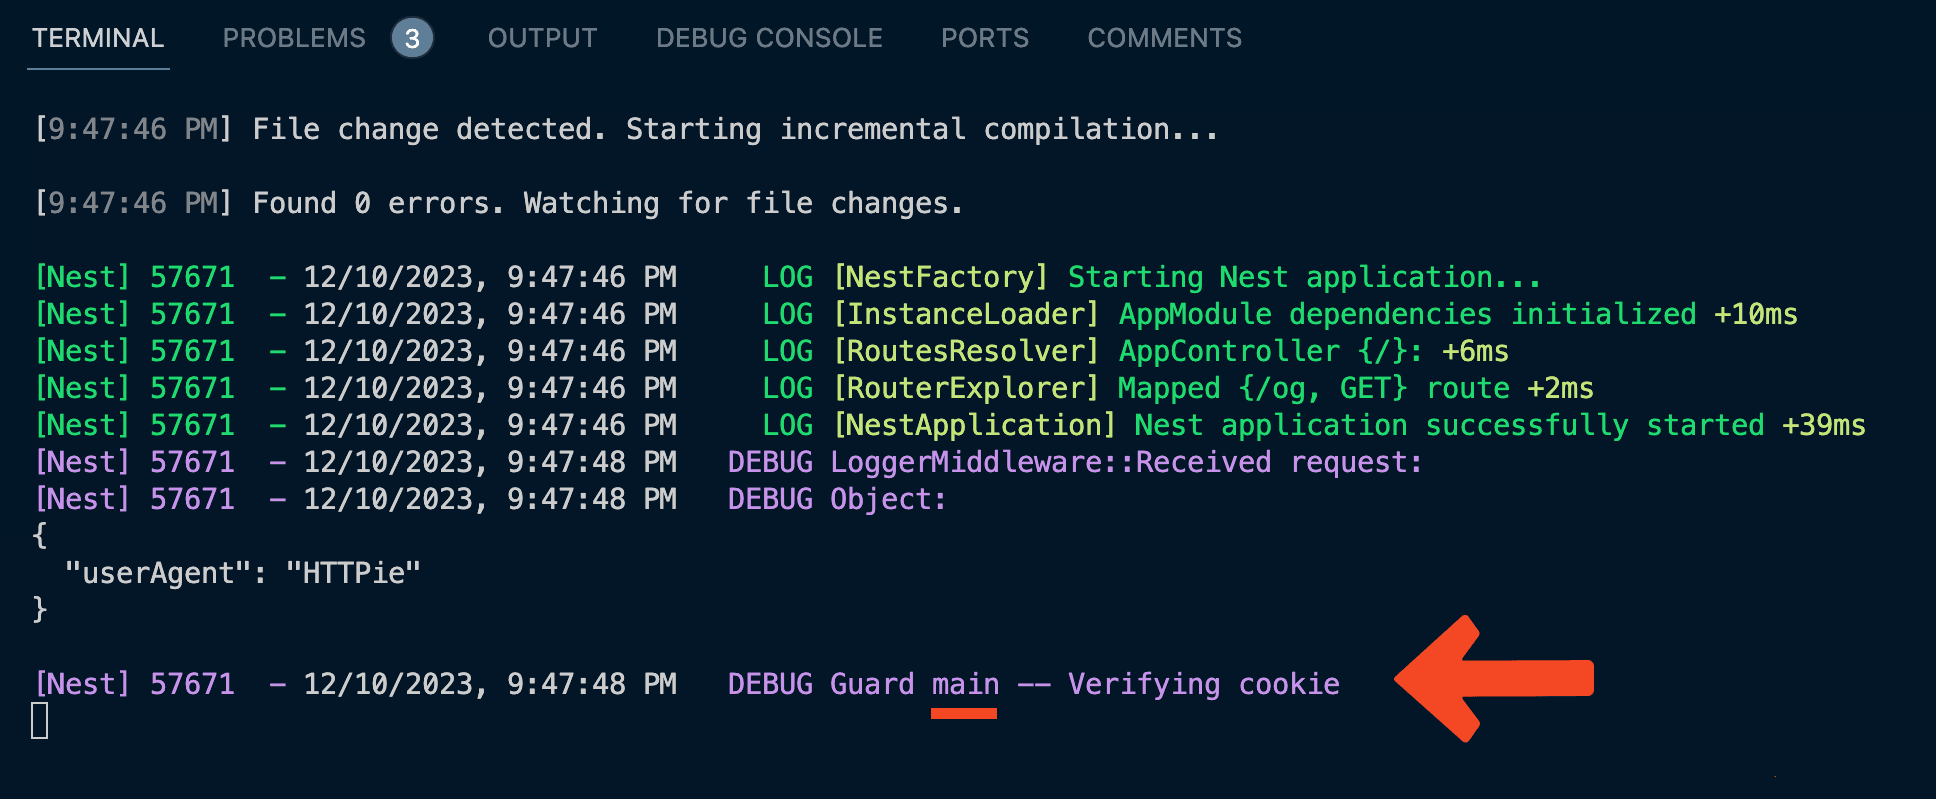
We can see here the Guard instance declared in main.ts is the one that threw
an error. We can also see the Guard is executed after the Middleware.
Now, let's add the header and see what happens:
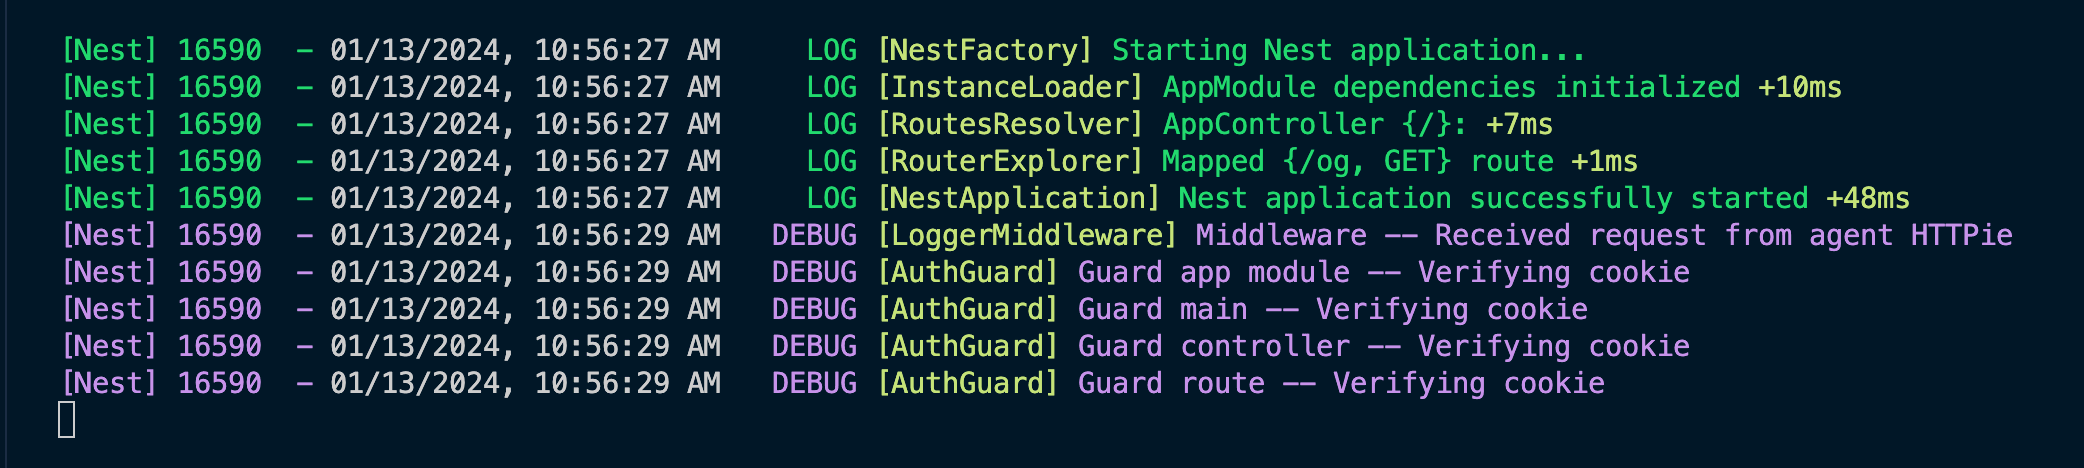
Interesting. The different instances of AuthGuard got triggered one after the other:
app module,main,controllerroute.
If you think about it, it feels natural that the control flow goes from global -> controller -> route.
From the highest/global level to the most specific one.
One interesting thing to note, though, is that the app module instance we declared at the Module level, is triggered before the main instance, declared at app level.
This is briefly explained in NestJS's request lifecyle FAQ:
If you are using app.useGlobalGuard() or providing the component via a module, it is globally bound. Otherwise, it is bound to a controller if the decorator precedes a controller class, or to a route if the decorator proceeds a route declaration.
That means that both app.useGlobalGuard() (for main) and @UseGuards() (for app module) ultimately do the same thing!
We should consider them at the same level and not rely on one being triggered before the other.
So far, we end up with the following request lifecycle:
Interceptors
Interceptors are a way to run some business logic before and after the route business logic execution (ie. the corresponding function in the Controller running).
Some use cases for Interceptors are:
- They can be used to monitor how long your request took to return to your client.
- They could also be used to implement a caching mechanism on some of your routes.
- Many more things!
Let's go with the first example and create a LoggerInterceptor:
export class LoggerInterceptor implements NestInterceptor {
  private readonly logger = new Logger(LoggerInterceptor.name)
  private instanceLevel: string

  constructor(private level: string) {
    this.instanceLevel = level
  }

  intercept(context: ExecutionContext, handler: CallHandler) {
    // Everything here happens before the business logic is executed
    const date = new Date()
    this.logger.debug(
      `LoggerInterceptor ${this.instanceLevel} -- Request count started.`,
    )

    // handle.handle() is the business logic execution
    return handler.handle().pipe(
      tap(() => {
        // Everything here happens after the business logic is executed
        const totalTime = new Date().getTime() - date.getTime()

        this.logger.debug(
          `LoggerInterceptor ${this.instanceLevel} -- Request completed in: ${totalTime} ms`,
        )
      }),
    )
  }
}
Implementation details aren't very relevant here, but know we are using rxjs's tap operator to run some code after the route business logic has been executed. NestJS doc on Interceptors.
Now let's add this Interceptor to our app. Just like Guards, they can be added at many levels:
// main.ts
async function bootstrap() {
  const app = await NestFactory.create(AppModule)
  // ...
  app.useGlobalInterceptors(new LoggerInterceptor('main'));
  await app.listen(3000)
}

// app.module.ts
@Module({
  // ...
  {
    provide: APP_INTERCEPTOR,
    useFactory: () => {
      return new LoggerInterceptor('app module');
    },
  }
})
export class AppModule {
  // ...
}

// app.controller.ts
@Controller()
// ...
@UseInterceptors(new LoggerInterceptor('controller'))
export class AppController {
  constructor(private readonly appService: AppService) {}

  // ...
  @UseInterceptors(new LoggerInterceptor('route'))
  @Get('/og')
  async getOG(): Promise<string> {
    console.log("Running business logic")
  }
}
Now, let's send a request:
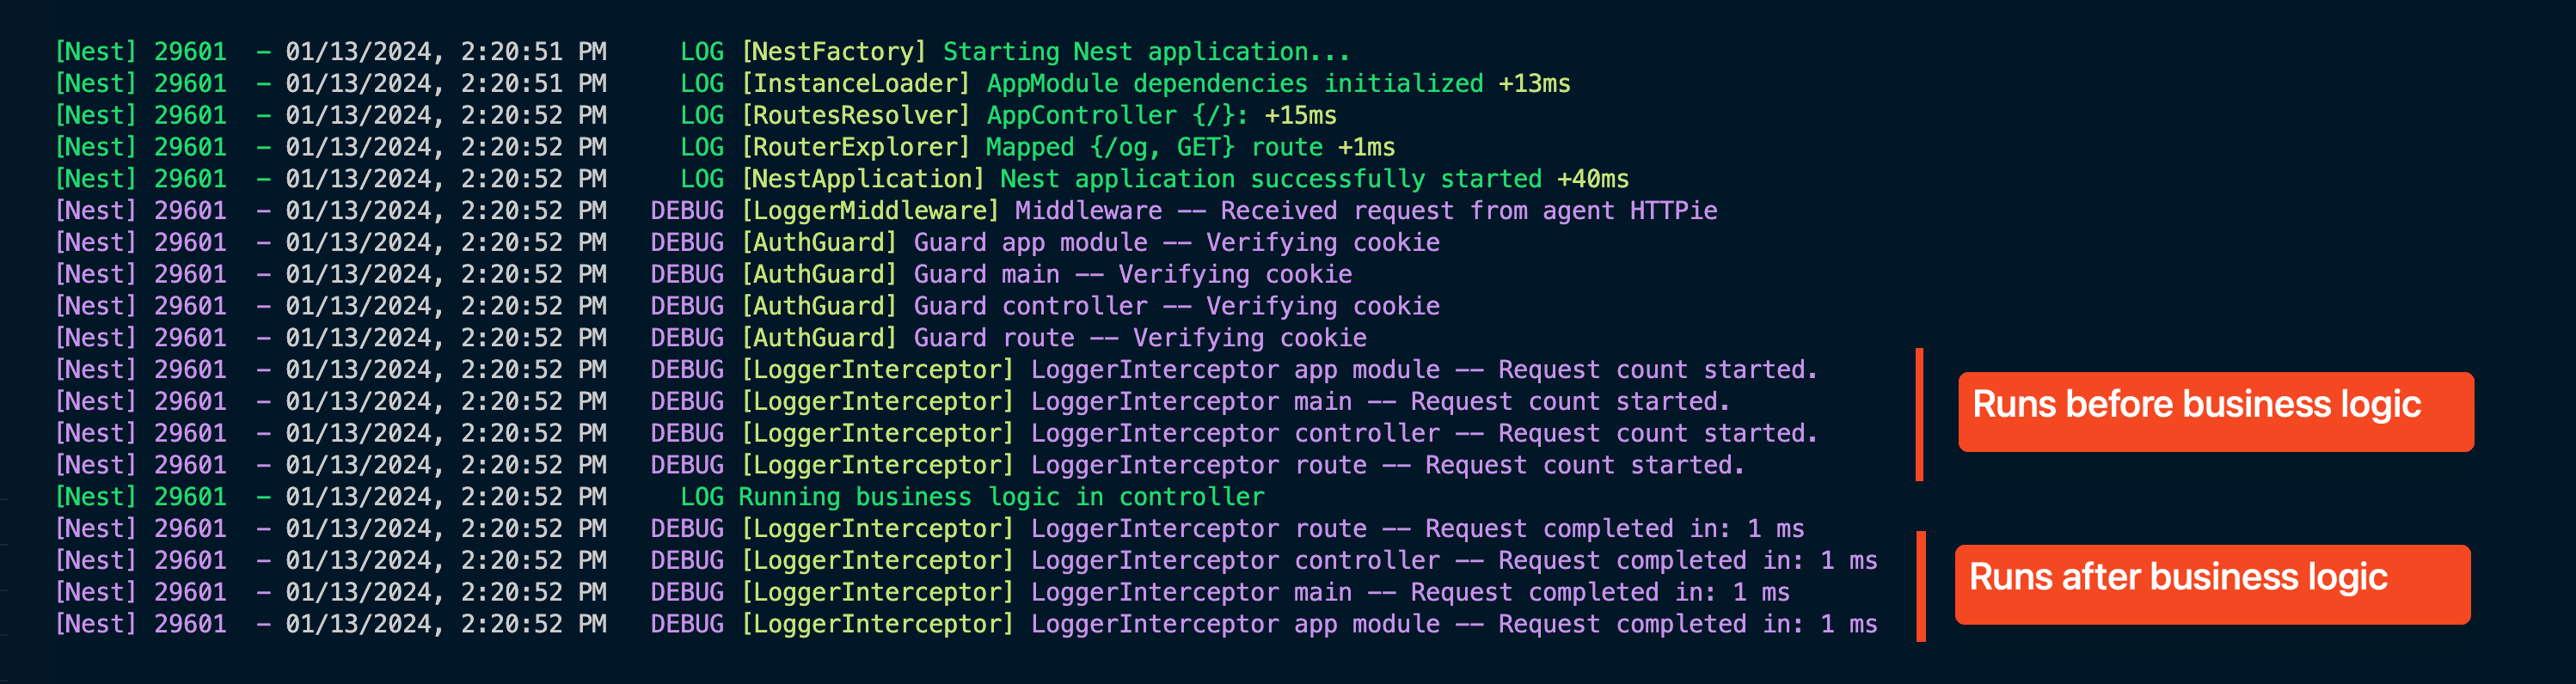
Hmm, this is getting VERY interesting 👀
- Interceptors follows the same
global -> controller -> routepattern - All Interceptors are always triggered after the Guards. The route-level (last) Guard runs before the global (first) Interceptor.
I think a lot of people (me included until I write this article) tend to think that we'd naturally first have all global level components run, then all controller ones and then route ones, but that's simply not the case.
Now we have discovered how Interceptors work, here is the request lifecycle in our app:
Pipes
Pipes are used to validate and transform data before it reaches the route business logic.
They validate the request body, query params, headers, etc. You can read more about them here.
Let's consider a use case where we want our business logic to be executed, only if the request contains a query parameter field name, that is string of 2 to 10 characters.
export class OgQueryDto {
  @IsString()
  @MinLength(2)
  @MaxLength(10)
  name: string
}
For the sake of testing the behaviour, let's create a custom Pipe that does the same as the ValidationPipe directly provided by NestJS, but with some extra logs:
@Injectable()
export class CustomValidationPipe implements PipeTransform {
  private readonly logger = new Logger(CustomValidationPipe.name)
  private instanceLevel: string

  constructor(private level: string) {
    this.instanceLevel = level
  }

  async transform(value: any) {
    this.logger.debug(
      `CustomValidationPipe ${this.instanceLevel} -- Validating`,
    )

    // ...
    const errors = validate(value)

    if (errors.length > 0) {
      throw new BadRequestException('Validation failed')
    }
    return value
  }
  // ...
}As usual, we can add Pipes at different levels:
// main.ts
async function bootstrap() {
  const app = await NestFactory.create(AppModule)
  // ...
  app.useGlobalPipes(new CustomValidationPipe('main'));
  await app.listen(3000)
}

// app.module.ts
@Module({
  // ...
  {
    provide: APP_PIPE,
    useFactory: () => {
      return new CustomValidationPipe('app module');
    },
  },
})
export class AppModule {
  // ...
}

// app.controller.ts
@Controller()
// ...
@UsePipes(new CustomValidationPipe('controller'))
export class AppController {
  constructor(private readonly appService: AppService) {}

  // ...
  @Get('/og')
  async getOGByName(
    // This is how you validate the query params
    @Query(new CustomValidationPipe('route')) query: OgQueryDto,
  ): Promise<string> {
    Logger.log('Returning: ' + query.name);
    return query.name;
  }
}
Now let's send a request again, but with query params that don't match the validation criteria:
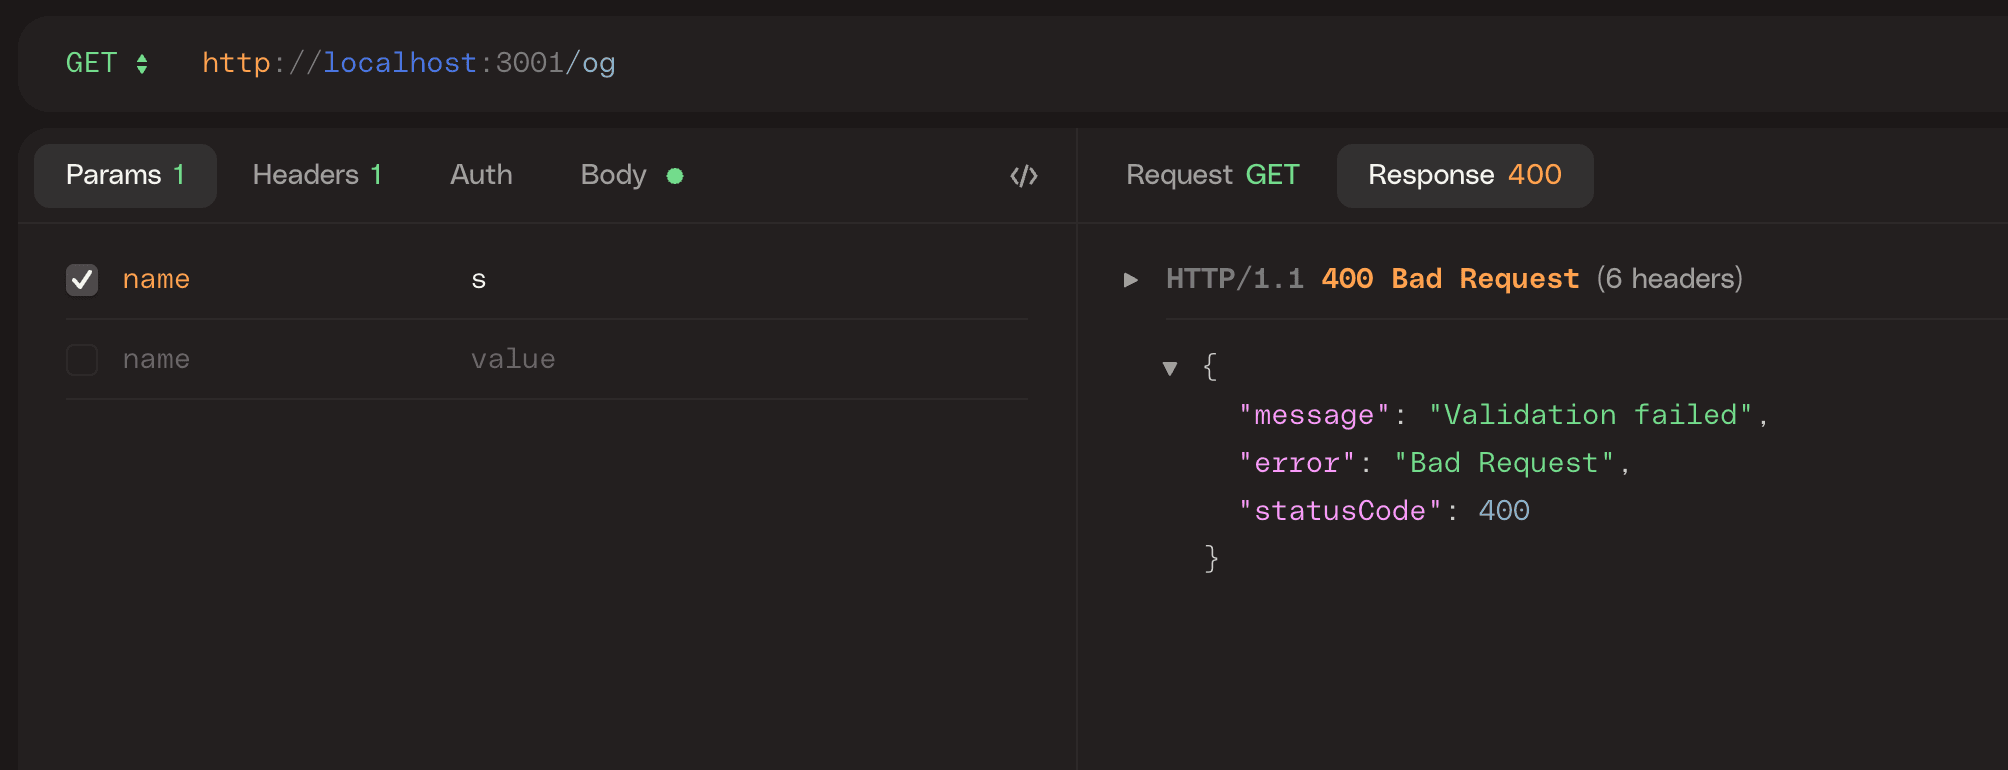
Cool. Like the others, the global Pipe at the module level threw an error. Now, let's send a request that will succeed:
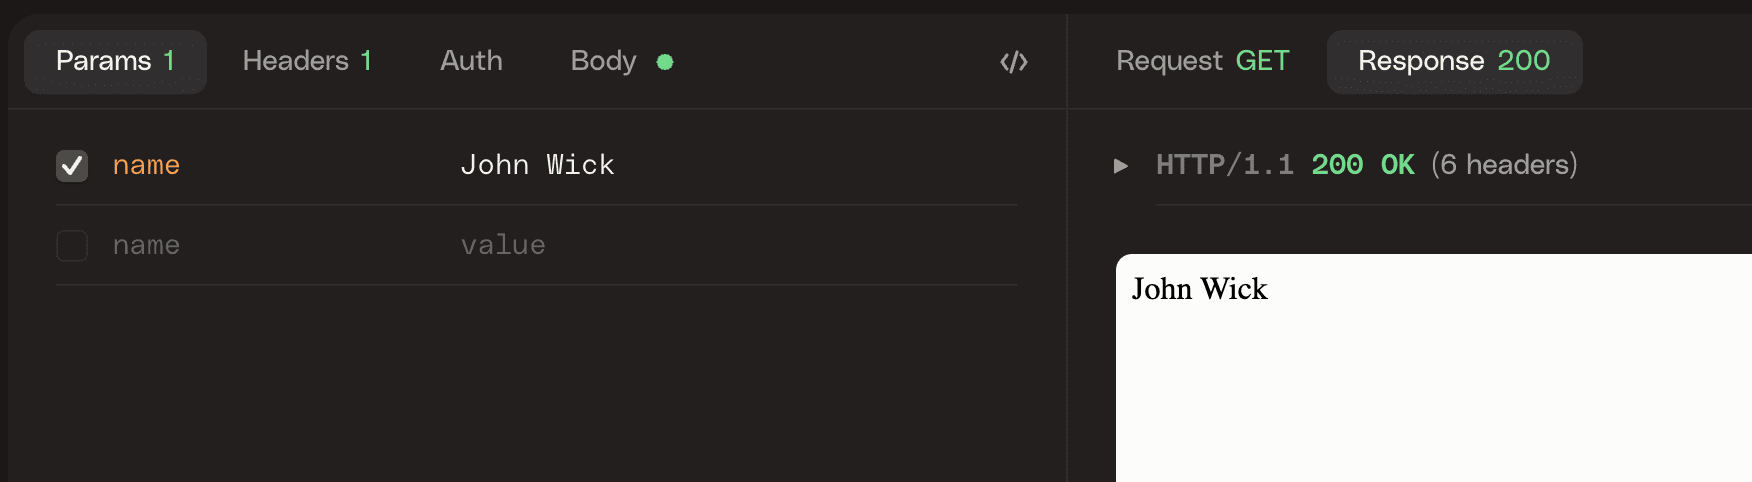
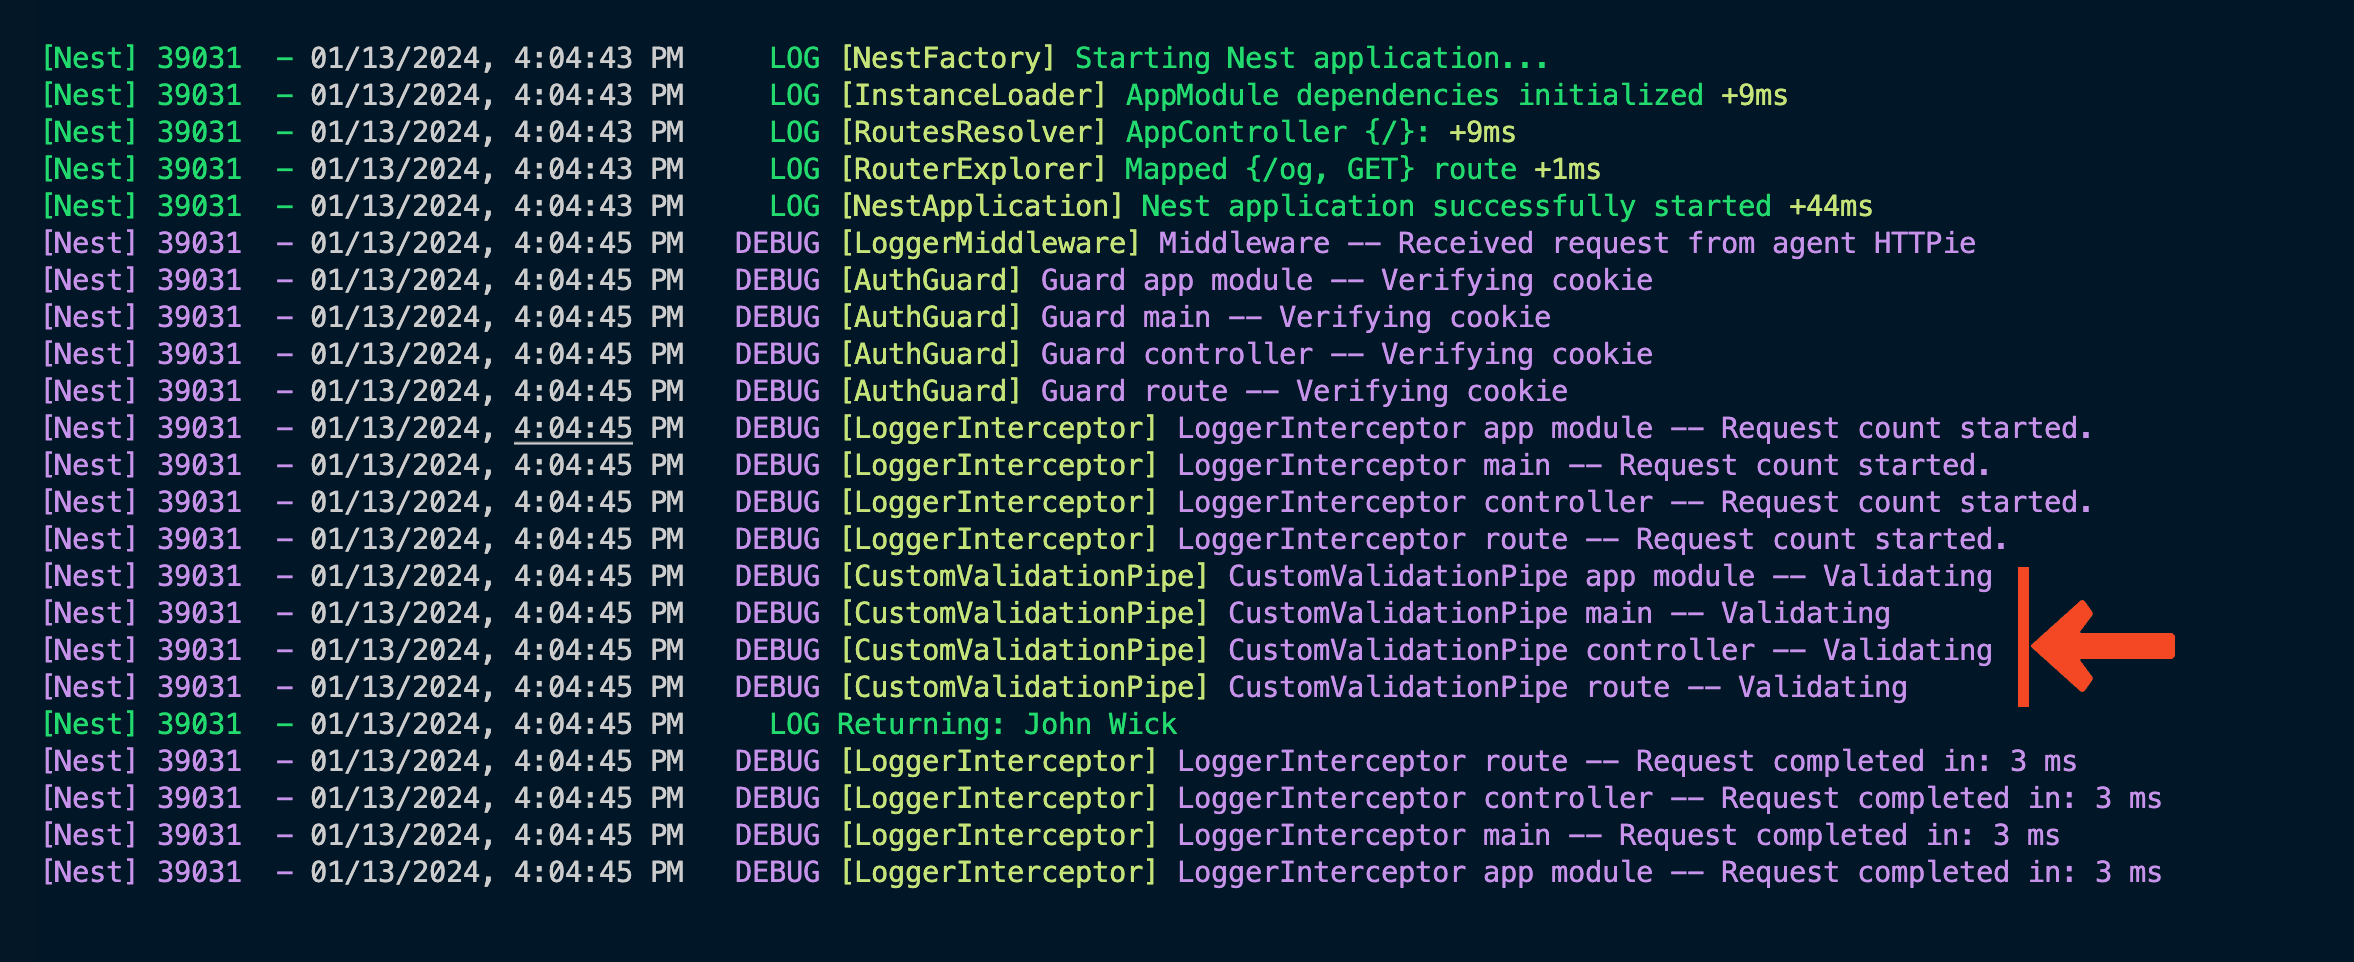
From the logs, we can see that once again:
- The Pipes are running all after
GuardsandInterceptors - The global
Pipeis running after the route-levelInterceptor
That gives us now the following:
Exception filters
Continuing our exploration, let's look at the last major component: Exception Filters. Like the others, they play a crucial role in the request lifecycle. They are the safety net of your application, catching unhandled exceptions that occur while processing a request.
They are especially useful for:
- Customizing the response sent back when an exception occurs (a correlation ID, for example).
- Logging errors for debugging purposes.
- Implementing a consistent error response structure across your application.
- Removing sensible information from the error response before sending it back to the client.
In our example, we will use it to catch deprecated routes and send back the new route that should be used.
// Here we create a specific error type for deprecated endpoints
export class DeprecatedEndpointException extends Error {
  constructor(
    public override message: string,
    public alternativeEndpoint: string,
  ) {
    super(message)
  }
}

// Here we create the filter that will return a specific response & headers
@Catch(DeprecatedEndpointException)
export class DeprecatedEndpointFilter implements ExceptionFilter {
  private readonly instanceLevel: string
  private readonly logger = new Logger(DeprecatedEndpointFilter.name)

  constructor(private level: string) {
    this.instanceLevel = level
  }

  catch(exception: DeprecatedEndpointException, host: ArgumentsHost): void {
    this.logger.debug(
      `Filter ${this.instanceLevel} -- Found a deprecated route`,
    )

    const ctx = host.switchToHttp()
    const response = ctx.getResponse<Response>()

    response
      .status(HttpStatus.GONE)
      .header('X-Deprecated-Message', exception.message)
      .header(
        'X-Deprecated-Alternative-Endpoint',
        exception.alternativeEndpoint,
      )
      .json({
        message: 'This endpoint is deprecated.',
      })
  }
}
Now, we add the filter to the app. At this point, you know the drill:
// main.ts
async function bootstrap() {
  const app = await NestFactory.create(AppModule)
  // ...
  app.useGlobalFilters(new DeprecatedEndpointFilter('main'));
  await app.listen(3000)
}

// app.module.ts
@Module({
  // ...
  {
    provide: APP_FILTER,
    useFactory: () => {
      return new DeprecatedEndpointFilter('app module');
    },
  },,
})
export class AppModule {
  // ...
}

// app.controller.ts
@Controller()
// ...
@UseFilters(new DeprecatedEndpointFilter('controller'))
export class AppController {
  constructor(private readonly appService: AppService) {}

  // ...
  @UseFilters(new DeprecatedEndpointFilter('route'))
  @Get('/og')
  async getOGByName(...): Promise<string> {
    throw new DeprecatedEndpointException(
      'This endpoint was removed because we all know who is the real OG',
      '/john-wick',
    );
  }
}
Let's give this a shot:
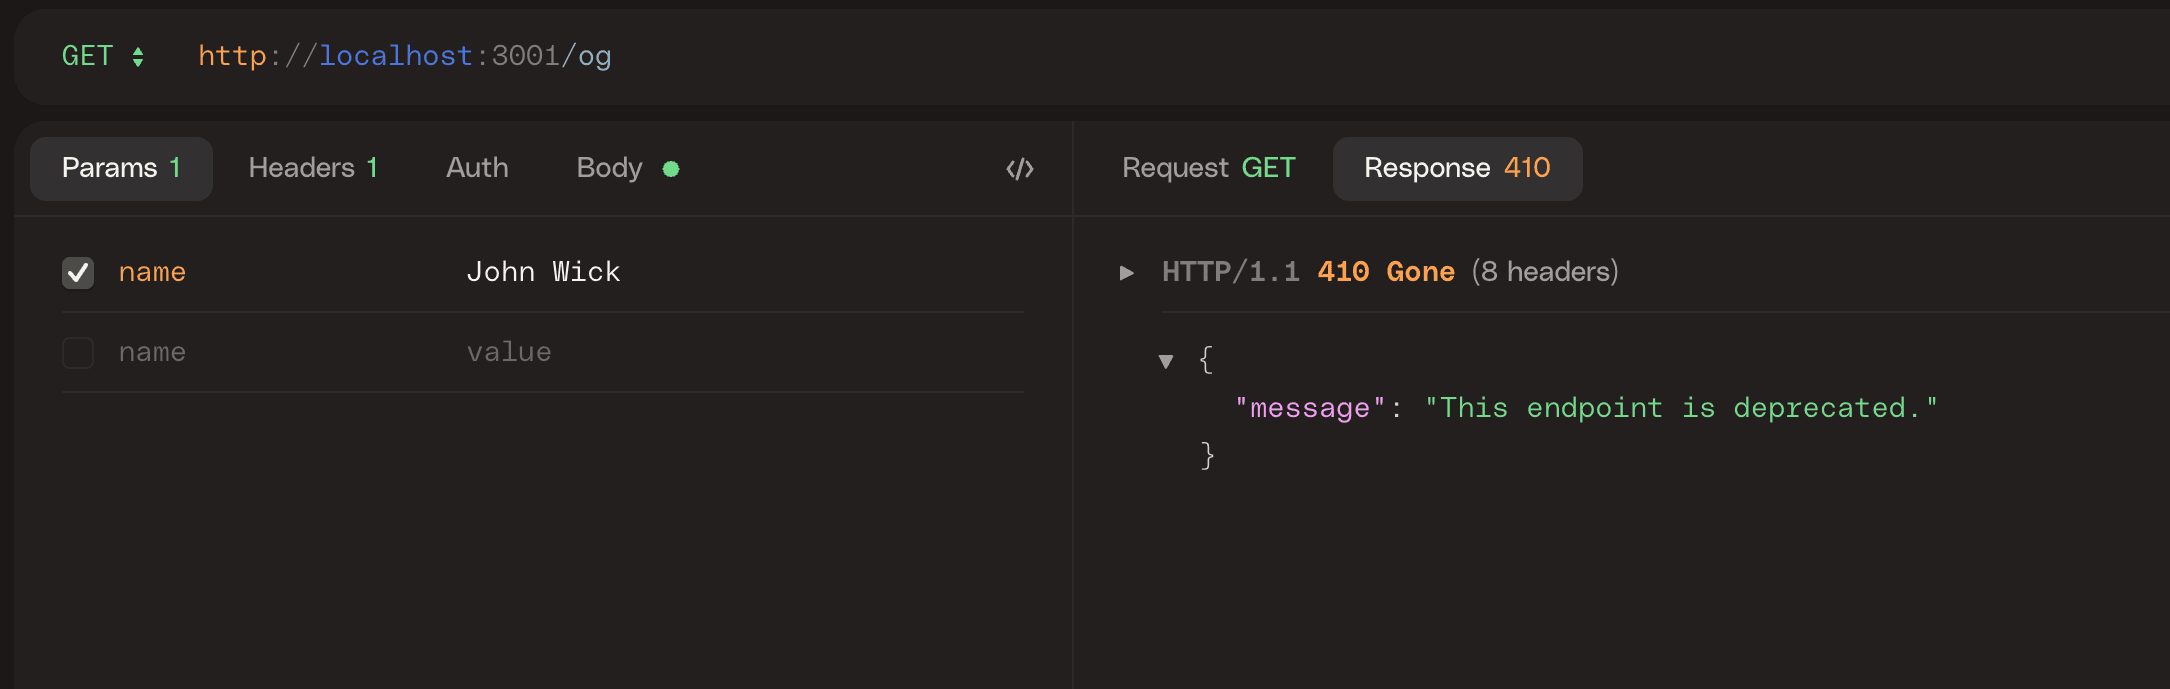
Nice! Now, let's look at the log. This Filter is only triggered once and a response is sent back to the client. We can't really see the order in which they are called, but only the one triggered is... wait, what? 🤔
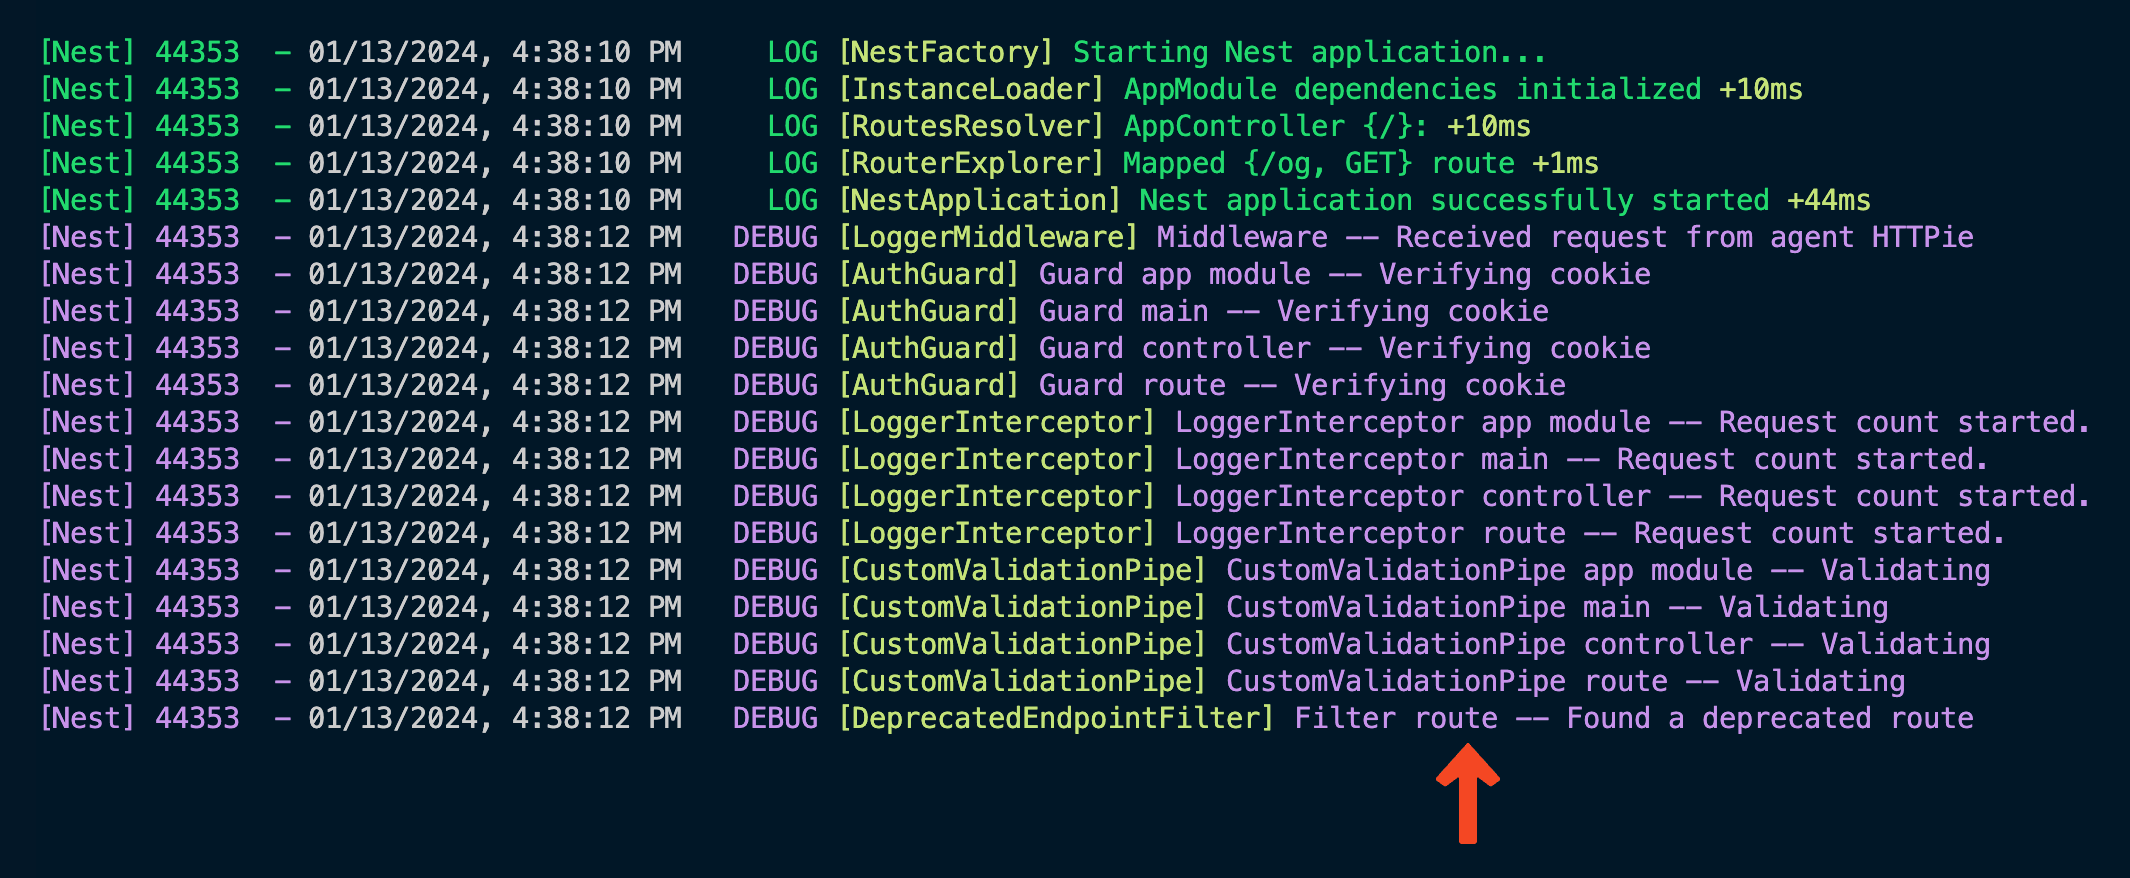
Here is something new! In the case of errors, the route instance is the first one called! If you think about how error boundaries are handled in JavaScript, it makes sense:
The first instance to catch the error is the one closest to the error itself.
But that means that Filters are one of the only components not triggered in the global -> Controller -> route order but rather in the route -> Controller -> global order.
Just to be sure, here are the logs after I remove the route level filter:
And after I remove the controller level filter:

So, to recap, here is the final request lifecycle:
Conclusion
This deep dive aimed at showing how much more complex than it seems the NestJS request lifecycle is. Hopefully this will help you choose the suitable component based on your requirements in the future and also help you debug issues you may have on code execution order.